Arcane Mapper supports a “package system” to easily export or import maps and assets. This is the best way to distribute both assets and maps. For assets, the reason is obvious – it packages all of the assets you wish to include in one file that can be easily imported. When you export maps, all of the assets required for that map are included automatically – so this is a great way of distributing maps while including only those assets that are required.
Export Package
To export a package, select Export from the File menu.
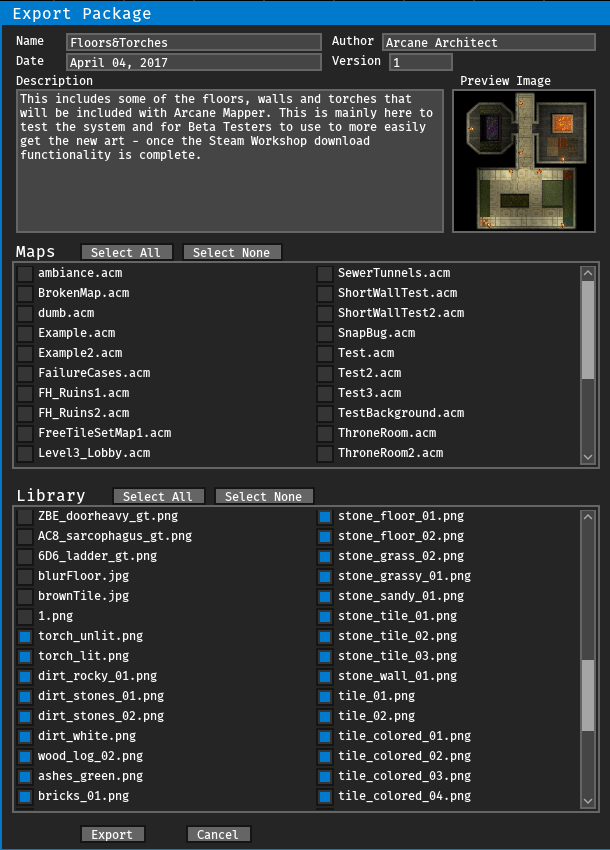
If you want to export a map(s) only, hit Select None on the Library section and then select the maps you wish to export. Otherwise selection whichever combination of maps and assets you want in the package.
Name
The name of the package. This will be the file name and the name listed on Steam Work shop if you upload the package.
Author
Put whatever name you want people to see to identify you as the author of your work.
Date
The date the package was exported, which can be modified if desired.
Version
The package version, if updating an existing package.
Description
The description of your package, this will be used as the item’s description if you upload it to Steam Workshop.
Preview Image
Click on the image area to change the preview image. This will be the image shown on Steam Workshop if the package is uploaded and must be a PNG or JPG and under 1MB. Obviously you should include a preview image for your package.
Maps
This shows all the maps you have in your Maps/ directory. Those maps where the check-boxes are marked (with the blue square in the middle) will be included in the package. Use the Select All and Select None buttons to quickly include every map or no maps.
Library
This shows all of the items in your Library. If you wish to include only those files necessary for your included maps to work then de-select all of them (the Select None button). Otherwise select the items you wish to be included. The package contains both the graphics and Library data such as height, light settings, scale settings, tags and other data.
Export
Hit export when you are ready, this will write the package into the Packages/ directory as name.pkg.
Cancel
Remove the package and cancel the operation.
Import Package
To import a package select Import from the File menu. The window that is shown will look very similar to the Export window shown in the Export Package section. By default all assets and maps in the package are selected for import but you can choose which to include in your import. Be very careful though, if you de-select assets required for a map, those items will not show up when loading the map.
Most of the controls are exactly the same as Export, though they show the data already inside the package. The Import button will import all of the assets into your Library and all of the maps into your Maps/ directory. Note that once a package is imported, it is no longer required.
Upload to Steam Workshop
To upload a package to Steam Workshop, select the Steam menu and then Upload Package. Note that the Steam menu is only available when you are logged into Steam.
You are prompted to select a package from your Packages/ directory. Once you do that you will be given the option to upload it to Steam Workshop. If the file has already been uploaded in the past, Arcane Mapper will simply update the same item on Steam – otherwise a new Steam Workshop item will be created.
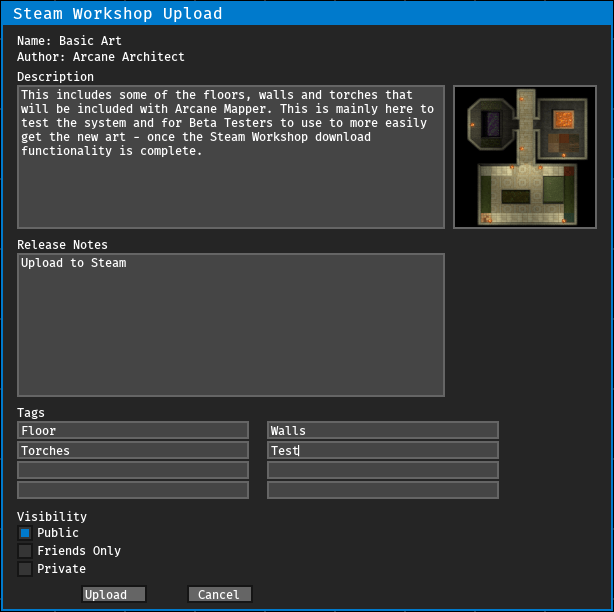
Note that the name, description and preview image setup in the package during the Export phase will be used for the Steam Workshop item as well. However you will be able to edit your item on Steam or update the item by re-uploading the package if you wish to change things.
Finally be sure to add Change Notes in the text edit area if this is an update. You will also need to select the Visibility of the item.
- Public: anyone can see and download the item.
- Friends Only: only your friends can see and download the item.
- Private: only you can see the item, useful for testing.
Finally you can enter up to 8 tags in the edit boxes in the Tags area. These are used to search for specific types of items in the Steam Workshop.
Once you hit the Upload button, the process of creating or updating the item and uploading to Steam will begin. The window will change to reflect progress and to show any errors. If required, the Steam Legal Agreement may be shown and must be acknowledged to continue. Once the upload begins, it cannot be canceled but you can delete the item on Steam if desired.
Import from Steam Workshop
To import Workshop items that you have Subscribed to on Steam, select the Steam menu and then Import Package. Note that the Steam menu is only available when you are logged into Steam.
Here is you will see a list of thumbnails for Steam Workshop Items that you are Subscribed to but have not yet imported. Simply click on a thumbnail to go to the Import window and import the item from Steam Workshop.
